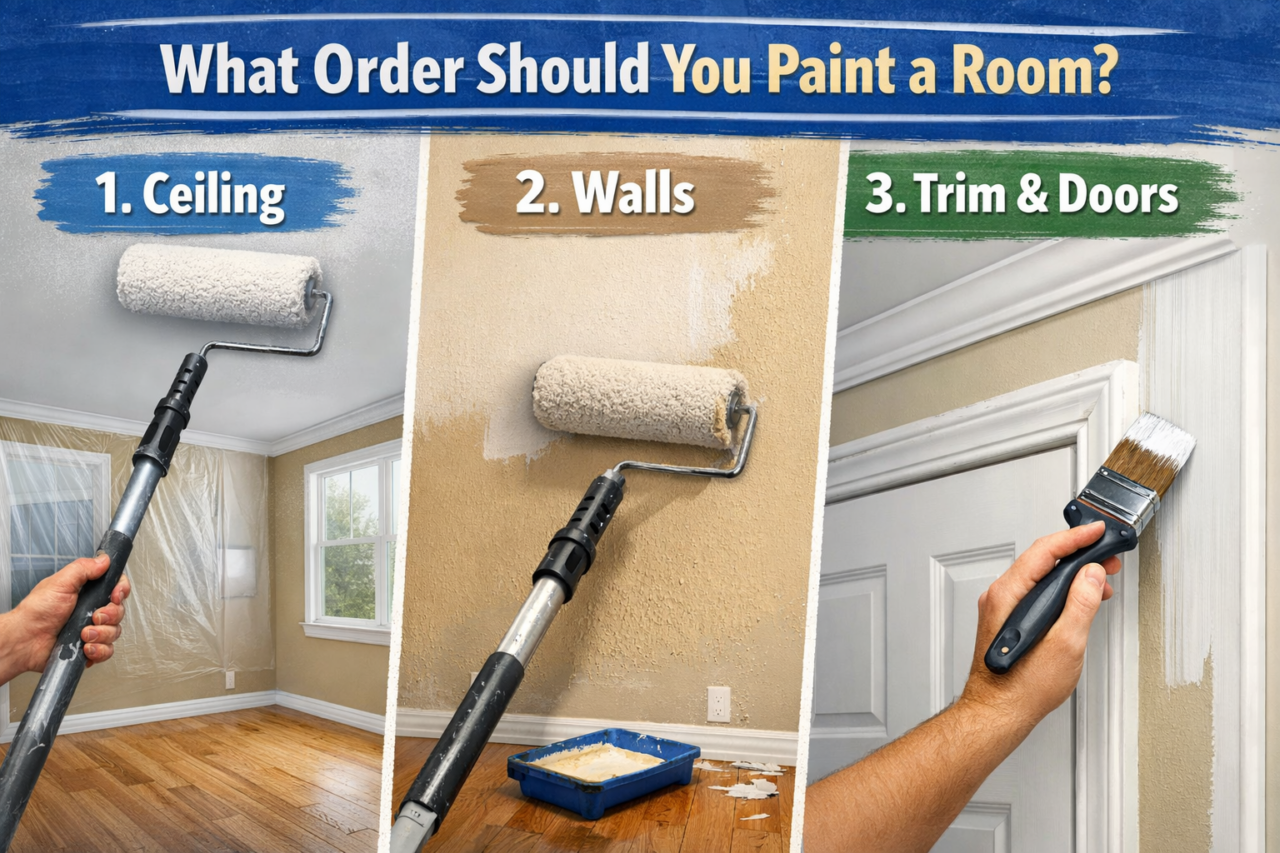
The best order to paint a room is:
Ceilings → Walls → Trim and Doors
Working from the top down prevents drips, roller splatter, and dust from ruining finished surfaces below. This sequence also allows you to slightly overlap paint lines during the wall stage and then sharpen them later when painting trim, creating cleaner edges and a more professional result.
Whether you are repainting a single bedroom, updating a living room, or refreshing an entire house before selling, this workflow consistently produces the cleanest and most efficient paint job.
Why Painting Order Matters When Painting a Room
When painting a room, the order you work in has a big impact on how clean and professional the finished result looks.
Gravity makes paint naturally move downward. Rollers throw tiny droplets, brushes flick splatter, and gravity pulls drips from ceilings to walls and from walls down onto trim and baseboards.
If you start painting in the wrong order, you can easily create extra work for yourself.
Common problems include:
• Repainting areas you already finished
• Sanding dried drips off trim
• Touching up baseboards
• Cleaning paint splatter from doors or floors
Following a logical painting sequence prevents those problems and helps the entire project move faster.
If you are gathering supplies before starting, I put together a full list of the rollers, brushes, trays, and prep tools I recommend for DIY painters. You can see my full DIY painting supply list here.
Step 1: Paint the Ceilings First
Ceilings should always be painted before anything else in the room.
Even experienced painters occasionally drip when working overhead, and roller splatter is unavoidable. By painting the ceiling first, any drips land on walls that have not been painted yet.
Ceiling paint can also dramatically improve how a room looks. Over time, ceilings develop subtle discoloration from dust, cooking oils, candles, or smoking. A fresh coat of ceiling paint helps brighten the entire space and reflect light more evenly.
Tips for Painting Ceilings
Use flat ceiling paint
Flat finishes hide roller marks and surface imperfections better than satin or eggshell paints. I usually like Sherwin Willaims SuperPaint for ceilings. Its affordable and does a great job covering ceilings.
Use an extension pole
Painting ceilings with only a roller frame often leads to uneven pressure and streaking. An extension pole allows smoother, more consistent passes.
Work in consistent sections
Roll in a “W” pattern and then back roll the area to even out coverage.
Cut in edges first
Use a brush to paint around crown molding, corners, and ceiling fixtures before rolling the larger areas.
If you are repainting multiple rooms, it is usually fastest to paint all ceilings first before moving on to walls.
Step 2: Paint the Walls
Once the ceiling paint has dried, the next step is painting the walls.
Walls represent the largest surface area in most rooms. Painting them after the ceiling allows you to slightly overlap the ceiling line with wall paint, which helps hide minor imperfections in your cut line.
Most DIY painters find that rolling walls is the easiest and fastest part of the project once prep work is complete.
If you are repainting a room to improve resale value or refresh a rental property, neutral colors tend to perform best.
Popular neutral choices include:
• Sherwin-Williams Alabaster
• Sherwin-Williams Agreeable Gray
• Sherwin-Williams Accessible Beige
• Warm soft whites
These colors photograph well in listing photos and make rooms feel brighter and more spacious.
Wall Painting Tips
Use a quality 9-inch roller cover
Cheap rollers shed lint and leave an inconsistent texture on the wall. Learn all you need to know about different rollers.
Work from top to bottom
Start near the ceiling line and roll downward.
Maintain a wet edge
Roll adjacent sections before the previous section dries to avoid lap marks and streaking.
Expect two coats
Most wall colors require two coats for full, even coverage.
Painting the walls after the ceiling also lets you easily cover any small splatter marks that landed during the ceiling stage.
Step 3: Paint Trim, Doors, and Baseboards Last
Trim work is saved for the final stage because it requires the most precision.
Baseboards, door casings, window trim, and interior doors are typically painted using semi-gloss or satin finishes. These finishes are durable and easier to clean, but they also highlight brush marks and imperfections.
By painting trim after the walls have fully dried, you can cut clean lines where trim meets the wall color.
That final trim pass is what gives a room those crisp edges that make a paint job look clean and professional.
Trim Painting Tips
Use a high-quality angled sash brush
A 2–2.5 inch angled brush gives you much better control along edges and corners.
Apply thin coats
Heavy coats tend to sag and create drips along trim profiles.
Lightly sand between coats
A quick pass with fine sandpaper smooths the surface and removes brush texture.
Remove painter’s tape before paint fully cures
This prevents peeling or tearing the finish.
Interior doors are usually painted during this stage as well. If possible, remove the door and paint it flat on sawhorses for the smoothest finish.
When It Makes Sense to Paint Trim Before Walls
Some professional painters prefer to paint trim before the walls, especially when using a paint sprayer.
The typical workflow looks like this:
-
Spray trim and doors
-
Allow them to dry
-
Mask the trim carefully
-
Roll the walls afterward
Spraying trim can produce an extremely smooth finish, but it requires additional setup, masking, and equipment.
For most homeowners painting by hand with rollers and brushes, the traditional ceiling → walls → trim order is still the simplest and safest approach.
Prep Work That Makes Painting a Room Faster
Good preparation can dramatically improve both the speed and the final quality of a paint job.
Before painting, take time to:
• Clean dusty walls so paint adheres properly
• Fill nail holes with lightweight spackle
• Sand rough patches smooth
• Protect floors and hardware with painter’s tape and drop cloths
These small prep steps prevent many of the problems people notice after the paint dries.
FAQ
Should I paint closets before or after the main room?
Closets are usually painted at the same time as the room they connect to. Freshly painted closets help reinforce the clean, well-maintained appearance of the space.
Do I need primer before painting?
Primer is recommended when covering:
• Dark colors
• Smoke stains
• Water stains
• Glossy surfaces
• New drywall
If you are repainting similar colors with high-quality paint, primer may not always be necessary.
If you are working with new drywall or repairs, you may want to read my guide on painting over unfinished drywall before skipping primer.
How long should I wait between ceilings, walls, and trim?
Most paints require 12–24 hours of dry time before applying the next stage. Always follow the manufacturer’s instructions printed on the paint can.
Is it faster to paint an empty room?
Yes. Painting an empty room is much faster because you do not need to move furniture or work around obstacles.
Many DIY painters find they can complete a room 30–50 percent faster when the space is completely cleared.
What tools make painting easier for homeowners?
A few tools make a huge difference in speed and finish quality:
• Extension poles
• High quality roller covers
• Angled sash brushes
• Sturdy paint trays
• Heavy drop cloths
If you want to see the exact tools and supplies I recommend, you can view my full setup here.
Affiliate Disclaimer
Some of the links in this article may be affiliate links. That means if you purchase through them, I may earn a small commission at no additional cost to you.
I only recommend tools and supplies that I personally use, trust, or would feel comfortable using on a client’s home. The goal is simply to help DIY homeowners choose materials that actually make the job easier and produce better results.
If you try any of the recommended products and your experience is anything less than five stars, please let me know. I always want these guides to reflect real-world results, not just product marketing.