The Complete Drywall Tools List (What I Actually Use on Real Jobs)
Most people think drywall is simple, and in theory, it is.
Cut it. Screw it up. Spread some mud. Done.
Then they try it.
And suddenly they realize they’re making three trips to the store because they don’t have half the tools they actually need.
I’ve been doing drywall repairs and installs for years here in the Cleveland area. Old houses. Plaster patches. Water damaged ceilings. Full basement finishes. I’ve made the mistakes so you don’t have to.
This is the complete drywall tools list I keep on my truck. It covers everything from small patches to hanging full sheets. If you’re a first-time homeowner, DIYer, or you’re tackling repairs yourself, this is what you actually need. No fluff. No contractor-only specialty stuff. Just tools that work.
If you want the easiest way to buy pieces or the whole setup in one shot, start here:
My Drywall Tools Storefront at Lowe’s (One-Stop List)
Jump to What You Need
- Quick Start Kits
- Cutting & Layout Tools
- Hanging & Fastening Tools
- Taping & Mudding Tools
- Sanding Tools
- Access & Safety Tools
- Dust Protection & Prep
- Learn the Skills
- Hire a Pro (Northeast Ohio)
Quick Start: Buy This Based on What You’re Doing
Option 1: The Patch Kit (small holes, dents, repairs)
- Utility knife
- 6-inch drywall knife
- Mud pan
- Joint compound
- Sanding sponge
- Tack cloth
- Plastic sheeting + painter’s tape (dust control)
Get the full Patch Kit tools here
Option 2: The Hang-a-Sheet Kit (basements, remodels, full boards)
- Utility knife + T-square + tape measure
- Drywall screws
- Drill (or screw gun)
- Sawhorses
- 6-inch + 10-inch knives
- Pole sander + sanding screens
- Dust protection
Get the full Hang-a-Sheet setup here
Why Having the Right Drywall Tools Makes or Breaks the Job
Drywall is unforgiving.
- Bad cuts show.
- Overdriven screws show.
- Cheap knives leave waves.
- Wrong sanding tools create a dust storm.
I’ve seen more frustration from using the wrong tools than from the job itself. When I walk onto a drywall job, I’m not guessing. I know exactly what I’m using and why. Every tool on this list has earned its spot on my truck.
Good drywall work is about control. Clean cuts. Flat seams. Tight corners. Smooth finishes. The right tools make that possible.
Cutting and Layout Tools
These are the first tools that come out. If your cuts are bad, everything downstream gets harder.
Utility Knife
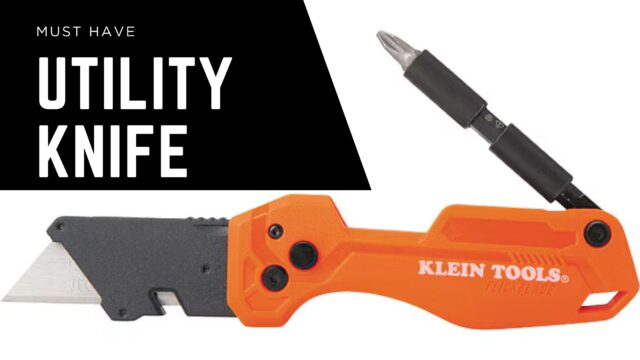
This is the backbone of drywall cutting. It’s almost ridiculous how effective it is.
People assume drywall needs to be sawn through. It doesn’t. You score the paper, snap the board, then cut the back paper. That’s it. A simple utility knife can cut full sheets perfectly clean when used correctly.
Drywall is designed to break on a score line. Once you understand that, cutting becomes fast and controlled instead of messy and loud.
What I look for in a drywall utility knife:
- Foldable design for safety
- Solid locking mechanism (no blade wobble)
- Comfortable grip for repeated cuts
- Easy blade changes
- Bonus if it doubles as a screwdriver (handy for wall plates, fixtures, and quick adjustments)
Two good options:
Basic: Kobalt Compact Lockback Utility Knife
Pro: Klein Folding Utility Knife with Driver: I think the Klein is better than the Milwaukee because of the additional locking position that comes in handy from time to time.
Why this tool works so well:
Drywall is a gypsum core sandwiched between paper. When you slice through the face paper, the board wants to break along that weakened line. That snap is controlled and clean. No dust cloud. No power tool required. No rough edges.
It’s one of the few construction materials where the simplest tool really is the best tool.
Technique matters more than force.
- Score once, firm and confident.
- Don’t try to cut all the way through the board.
- Score the face paper first.
- Snap the board away from the cut.
- Cut the back paper clean.
If you make multiple light passes instead of one confident score, the edge gets fuzzy and uneven. One solid pass is cleaner and faster.
Blade sharpness matters. Dull blades tear paper. Tearing paper leads to weak edges and rough seams. I change blades more often than most DIYers think is necessary. Blades are cheap. Fixing rough seams is not.
When a utility knife is NOT the right tool:
If you’re cutting into existing drywall for a patch, especially mid-wall, a utility knife alone is rarely enough. That’s where an oscillating multi-tool or drywall saw makes more sense. A multi-tool gives you controlled plunge cuts and cleaner square openings without crushing surrounding drywall.
But for cutting full sheets, trimming edges, and shaving down small adjustments? The utility knife wins every time.
Pro tip: Score once, deep and firm. Don’t try to slice all the way through. Score the paper side first, snap, then cut the back paper. Clean and fast.
Drywall T-Square
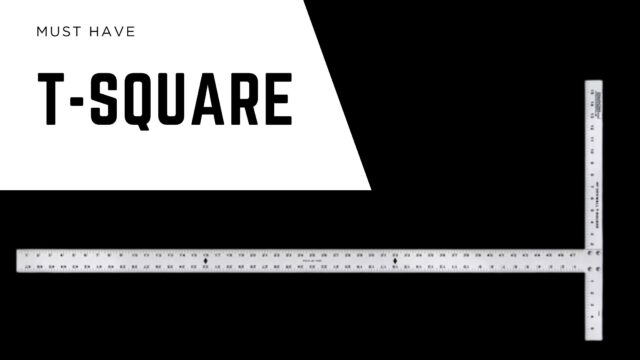
If you’re cutting full sheets, you need a true 48-inch drywall T-square.
This isn’t optional.
Drywall sheets are 4 feet wide. A 48-inch T-square lets you mark and score a perfectly straight cut across the entire sheet in one pass. No measuring at both ends. No chalk lines. No guessing.
That matters more than people think.
When beginners try to “measure and connect the dots,” they often end up with slightly angled cuts. Even being off by 1/8 inch across a sheet creates gaps at seams and makes taping harder.
A drywall T-square eliminates that problem.
How to Use a Drywall T-Square Properly
- Measure your cut length on one edge of the sheet.
- Hook the head of the T-square tightly against the factory edge.
- Align the blade of the square with your measurement mark.
- Hold it firmly in place with your knee or free hand.
- Score once, clean and firm, along the edge.
- Snap the sheet and cut the back paper.
That’s it. No complicated layout. No second guessing.
The key is pressure and stability. If the square shifts while you score, the cut won’t be straight. I often brace it with my knee or clamp it when working alone.
What to Look For
• Lightweight aluminum
• A true 48-inch blade
• A solid head that sits flush against the sheet edge
The one I recommend:
Johnson Level Aluminum Drywall T-Square
This is one of those tools that feels unnecessary until you use it. After that, you’ll never try to freehand full sheet cuts again.
Tape Measure
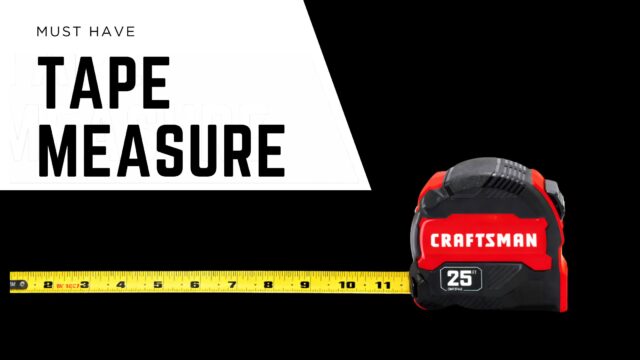
I carry a 25-foot tape for drywall. It’s long enough for layout but compact enough to clip on your belt.
CRAFTSMAN Compact Easy Grip 25-ft Tape Measure
Hanging and Fastening Tools
Once it’s cut, it needs to go up straight and tight.
Drywall Screws
Use the right screws. Fine thread for metal studs. Coarse thread for wood studs.
For standard 1/2-inch drywall over wood framing, 1-1/4-inch screws are the move.
1-1/4-in Drywall Screws (Lowe’s search link)
Pro tip: Sink the screw just below the surface without tearing the paper. If you break the paper, that screw loses holding strength.
Power Tool (Drill or Screw Gun)
You can use a regular drill, I do. But it needs control. If you’re hanging a lot, a drywall screw gun is faster. For most homeowners, a good drill is fine.
Screw Guns at Lowe’s (Fast drywall hanging)
You don’t need contractor-grade everything. You do need control. If you are still new to using drills, getting a DEWALT Screwdriver Bit Set will save you a ton of headaches for just a few bucks.
Sawhorses
Trying to cut drywall on the floor is miserable. Sawhorses give you a stable work surface, proper height, and clean snapping leverage.
Pony 2-Pack Sawhorses (1200-lb capacity)
Even for small jobs, I set these up. It saves your back and your cuts.
Taping and Mudding Tools
This is where drywall goes from “installed” to “finished.” This is also where bad tools ruin everything.
If you want the full drywall setup in one place, here it is again:
Drywall Storefront at Lowe’s (One-Stop List)
Mud Pan
You need a pan that cleans easily and doesn’t flex. Plastic pans flex and get chewed up.
WAL-BOARD TOOLS Drywall Mud Pan
6-Inch Drywall Knife
This is your base knife. I use it for bedding tape, first coats, small patches, and screw fills.
A bad knife leaves lines. A good one flexes clean.
10-Inch Taping Knife
This is for widening seams and second coats. Drywall finishing is about feathering. The wider the knife, the flatter the seam.
Warner Pro Grip 10-in Stainless Taping Knife
You don’t need six knives. A 6-inch and a 10-inch handle most homeowner projects.
Corner Trowel (Inside Corners)
Inside corners are where beginners struggle. A corner trowel helps keep both sides even and crisp.
Marshalltown Inside Corner Drywall Trowel
Use it lightly. Don’t overwork the corner.
Joint Compound
There are different types for different stages.
- All-purpose for bedding and strength
- Lightweight for finish coats and easier sanding
- Setting-type for fast repairs
Good options:
SHEETROCK All-Purpose Joint Compound (Bucket)
SHEETROCK Plus 3 Lightweight Joint Compound (Pail)
SHEETROCK Easy Sand 18 (Setting-Type Powder)
Sanding Tools
Sanding separates decent drywall from clean drywall.
Sanding Sponge
Great for corners, small patches, and tight spaces.
3M PRO Grade Precision 120-Grit Sanding Sponge
3M PRO Grade Precision 220-Grit Sanding Sponge
Sanding Screens
I prefer screens for bigger areas because they don’t clog like paper.
WAL-BOARD TOOLS 220-Grit Sanding Screens (5-Pack)
Pole Sander
If you’re sanding ceilings or long seams, don’t do it by hand.
Pro tip: Light pressure. Let the tool do the work. Over-sanding burns through drywall paper.
Access and Safety Tools
You cannot finish drywall safely without stable footing.
Step Ladder
For walls and lower ceilings, a solid step ladder is enough.
Little Giant Xtra-Lite Plus 5-ft Step Ladder (375-lb rating)
Work Platform or Adjustable Ladder
For ceilings, especially in older Cleveland homes with uneven floors, stability matters. Never stretch to reach. Move the ladder.
Dust Protection and Prep
Drywall dust gets everywhere. If you skip this, your house will remind you.
Plastic Sheeting
Use it to seal off doorways, protect floors, and contain sanding areas.
Project Source 10-ft x 25-ft 3-mil Plastic Sheeting
Painter’s Tape
Painter’s tape isn’t just for clean paint lines. In drywall work, it’s mainly about dust control and protection.
You use it to:
• Seal plastic sheeting over doorways
• Protect baseboards and trim
• Tape off vents
• Create temporary dust barriers
If you’re sanding without sealing off the space properly, drywall dust will end up everywhere. Inside cabinets. In HVAC returns. On furniture three rooms away. Tape is part of your containment system.
Why Cheap Tape Causes Problems
Low-quality tape can:
• Tear while removing
• Leave adhesive residue
• Pull fresh primer off the wall
• Fail to stick to plastic sheeting
That turns a five-minute prep step into a cleanup headache. For drywall work, you want tape that sticks firmly but removes cleanly.
What to Look For
• Medium adhesion
• Clean removal
• Good hold on plastic sheeting
• Consistent edge
The one I recommend:
ScotchBlue Painter’s Tape (Multi-Pack)
Pro tip: Don’t leave tape on for days. Remove it within 24 hours after painting or priming for the cleanest results.
Tack Cloth
This is one of the most skipped steps in DIY drywall. And it shows.
After sanding, your wall is covered in ultra-fine drywall dust. You might not see it clearly, but it’s there. If you prime over that dust, you’re basically sealing debris into your finish.
That leads to:
• Rough texture under paint
• Poor primer adhesion
• Flashing and uneven sheen
• Extra sanding later
A tack cloth removes that fine powder that vacuums and dry rags leave behind.
How to Use It Properly
Lightly wipe the surface. Do not scrub hard. You’re lifting dust, not polishing the wall.
Work from top to bottom and refold the cloth as it loads up. One cloth can handle a decent sized room if you’re not grinding it into the surface.
What to Look For
• Sticky, but not overly wet
• Leaves no residue
• Individually sealed if possible
If you want smooth paint, this step is not optional. It takes five minutes. It saves you from sanding again.
Project Source Tack Cloth (2-Pack)
Next: Learn the Skills
- How to Patch Drywall So It Blends In
- How Do I Match Wall Texture After a Patch?
- What Type of Screws Should I Use for Drywall?
- Picking the Right Drywall Knife Sizes
Hire a Pro (Northeast Ohio)
If you’re in Northeast Ohio and decide you’d rather not deal with drywall dust in your house, Colin Can Help handles drywall repair and finishing professionally.
If You Like This Style, You’ll Like My Books
If you stuck with this article all the way to the end, you’ll probably like the drywall and home improvement books I have available on Amazon here:
Colin Ross on Amazon
Affiliate Note:
Some links in this article may be affiliate links. If you buy through them, I may earn a small commission at no extra cost to you. I only recommend products I use or trust. If you try one and it’s anything less than a five-star experience, please let me know.

Scan to join our Loyalty Program, get a free coupon for your next service, and stay up to date on our services and articles.
Affiliate Note
Some of the links in this article may be affiliate links. That simply means if you choose to buy through them, I may earn a small commission at no extra cost to you. I only recommend products I trust and would feel comfortable installing in my own home or a client’s home.
If you try something I recommended and it turns out to be anything less than a five-star experience, please let me know. I always want these recommendations to be genuinely helpful.